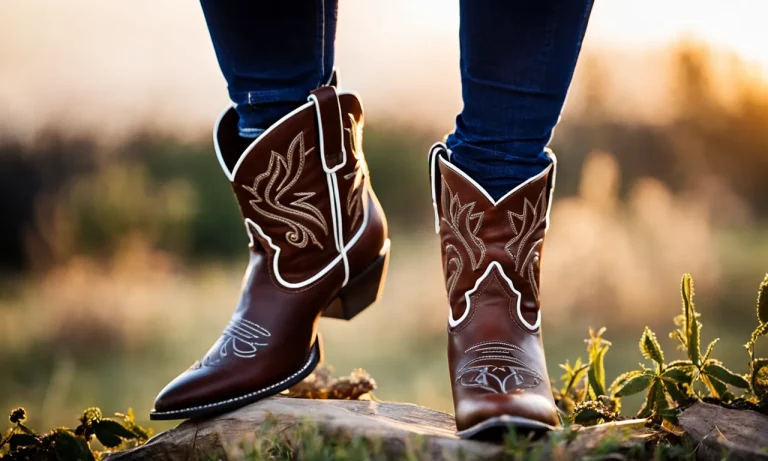
Cowboy boots are stylish footwear that can be paired with different outfits, but getting the right jeans to complement them can be tricky. If your jeans are too long, they end up bunching unattractively over the tops of your boots.
Luckily, with some simple planning and tools, you can easily modify your jeans at home to perfectly fit over your cowboy boots.
If you’re short on time, here’s a quick answer to your question: Roll or cut the bottom of your jeans to hit about an inch above the top of the boot shaft, tapering the inseam more than the outseam for a sleek silhouette.
Plan Ahead Before Cutting
Before you start cutting your jeans to fit perfectly with your cowboy boots, it’s important to plan ahead. Taking the time to properly plan and measure will ensure that you achieve the desired fit and style.
Measure Boot Shaft Height
The first step in planning ahead is to measure the height of your cowboy boot shaft. This will help you determine how much length you need to cut off your jeans. Use a measuring tape to measure from the top of your boot to the desired length of your jeans.
Keep in mind that you may want to leave a little extra length to account for shrinkage or any future alterations.
Account for Shrinkage
When planning to cut your jeans for cowboy boots, it’s important to account for shrinkage. Denim fabric has a tendency to shrink, especially after washing and drying. To avoid ending up with jeans that are too short, it’s a good idea to leave some extra length when cutting.
Consider leaving an additional inch or two to ensure that you still have the desired length after the jeans shrink.
Mark Cut Lines Before Cutting
Before you start cutting your jeans, it’s crucial to mark the cut lines. This will help you achieve a clean and precise cut. Use a fabric pencil or chalk to mark the desired length on both legs of your jeans.
Double-check the measurements and make sure the lines are straight before proceeding with the cutting process. Taking the time to mark the cut lines will prevent any mistakes and ensure that you achieve the desired fit.
Remember, cutting jeans for cowboy boots requires careful planning and precision. By measuring the boot shaft height, accounting for shrinkage, and marking the cut lines before cutting, you’ll be well on your way to achieving the perfect fit for your cowboy boot ensemble.
Use the Right Tools
When it comes to cutting jeans for cowboy boots, having the right tools is essential. Here are three tools that can help you achieve the perfect cut:
Scissors
A good pair of scissors is a basic tool that everyone should have in their sewing kit. When cutting jeans, it is important to use a sharp pair of scissors that can easily glide through the fabric. Make sure to choose a pair of scissors that are comfortable to hold and have a sharp blade for precise cutting.
Pinking Shears
Pinking shears are a type of scissors with a serrated blade that creates a zigzag pattern when cutting fabric. They are especially useful when cutting denim, as the zigzag edge helps prevent fraying. Using pinking shears can give your jeans a neat and professional finish, making them a great tool to have when cutting jeans for cowboy boots.
Seam Ripper
A seam ripper is a small tool with a sharp point and a hooked blade that is used to remove stitches. If you want to shorten your jeans without cutting them, a seam ripper can be very handy. Simply use the pointed end to carefully rip out the stitches along the hemline, and then fold the fabric up to the desired length.
This method allows for easy adjustments and preserves the original hem of your jeans.
Remember, using the right tools can make a big difference in the outcome of your jeans. So, make sure to invest in quality scissors, pinking shears, and a seam ripper to achieve the best results when cutting jeans for cowboy boots.
Cut Jean Legs to Proper Length
When it comes to wearing cowboy boots, getting the right fit with your jeans is essential for a polished look. Cutting your jean legs to the proper length can make a big difference in how your outfit comes together. Here are some tips on how to achieve the perfect length:
Trim Excess Fabric
The first step in cutting jeans for cowboy boots is to trim any excess fabric that may be dragging on the ground. This will not only prevent your jeans from getting dirty or damaged, but also give you a cleaner and more polished appearance.
Use a pair of scissors or a rotary cutter to carefully cut off the excess length. Make sure to leave enough fabric to cover the top of your boots, but not so long that it bunches up or drapes over them.
Taper Inseam More Than Outseam
When cutting your jeans, it’s important to taper the inseam more than the outseam. This means that the inside of the leg should be slightly shorter than the outside. Tapering the inseam will prevent the fabric from bunching up around your ankles when you wear your boots.
It will also give your legs a longer and leaner appearance. Take your time to measure and mark the desired length before cutting. Remember, it’s easier to take off more fabric later if needed, but you can’t add it back once it’s cut!
Cut Straight Across Outseam
When it comes to cutting the outseam, it’s best to keep it simple and cut straight across. This will ensure a clean and even edge that won’t fray or unravel. Use a ruler or a straight edge to guide your scissors and make a straight cut.
If you prefer a more distressed look, you can use sandpaper or a cheese grater to roughen up the edge and create a frayed effect. Just be careful not to overdo it and end up with a hole in your jeans!
Remember, cutting your jeans for cowboy boots is a personal preference, and there’s no one “right” way to do it. Experiment with different lengths and styles until you find what works best for you. And don’t be afraid to seek inspiration from fashion magazines or websites like Denim Blog or Pinterest.
With a little practice and patience, you’ll be rocking your cowboy boots in style!
Finish the Raw Edges
Once you have measured and marked the desired length for your jeans, it’s important to finish the raw edges to prevent fraying and ensure a clean, professional look. There are several methods you can use to achieve this.
Zigzag Stitch
A popular and effective way to finish raw edges is by using a zigzag stitch on your sewing machine. This technique helps to bind the fabric threads together and prevent fraying. Simply set your sewing machine to a zigzag stitch setting and sew along the edge of the fabric, making sure to catch the raw edge within the stitches.
This method works well on denim fabric and provides a durable finish.
Fray Check
If you don’t have access to a sewing machine or prefer a no-sew option, fray check is a great alternative. Fray check is a liquid adhesive that dries clear and helps to seal the fabric edges, preventing fraying.
Apply a small amount of fray check to the raw edge of your jeans and allow it to dry completely before wearing. It’s important to follow the manufacturer’s instructions when using fray check, as some brands may require multiple coats for added durability.
Iron-on Adhesive
Another option to finish the raw edges of your jeans is by using iron-on adhesive. This method involves applying a strip of adhesive tape along the raw edge of the fabric and using an iron to bond it in place. Iron-on adhesive provides a clean, finished look and helps to prevent fraying.
Make sure to choose an adhesive tape specifically designed for fabric to ensure a secure bond. Follow the instructions provided with the adhesive tape for best results.
Distress the Hem (Optional)
If you want to give your jeans a more rugged and worn-in look to match your cowboy boots, distressing the hem is a great option. There are several techniques you can use to achieve this look.
Create Fringe
One popular method to distress the hem is by creating fringe. To do this, start by marking the desired length of the jeans. Then, using a pair of sharp scissors, make small vertical cuts along the hem. Be careful not to cut too high up, as you want to maintain the overall length of the jeans.
Once you’ve made the cuts, use your fingers to pull and separate the threads, creating a fringed effect.
Make Holes or Slits
Another way to distress the hem is by making holes or slits. This technique can give your jeans a more edgy and worn look. To do this, use a seam ripper or a small pair of scissors to create small punctures or slits in the hem.
You can also use a cheese grater or sandpaper to roughen up the edges and create a more distressed look.
Rub with Sandpaper
If you prefer a more subtle distressed look, rubbing the hem of your jeans with sandpaper can achieve that effect. Simply take a piece of sandpaper and gently rub it against the hem, focusing on the areas where you want to create a worn-in look.
This will soften the fabric and give it a slightly faded appearance.
Remember, distressing the hem is an optional step and depends on your personal style preference. If you’re unsure, it’s always a good idea to start with a small section and see how you like the result before distressing the entire hem.
Conclusion
With some simple preparation and the right tools, you can easily modify your jeans at home to fit perfectly over cowboy boots. Measure the shaft height, account for shrinkage, and mark where to cut. Use sharp scissors to trim the leg evenly, tapering the inseam more than the outseam.
Finish the raw edges to prevent fraying. For a stylish, distressed jeans hem, consider adding fringe, holes, or rubbing with sandpaper. With your jeans comfortably tucked into your cowboy boots, you’ll be ready to rock your Western look.